
Dobot二次开发demo
开发者可以使用Dobot进行二次开发,实现各种不同的功能。本文教大家使用Arduino MEGA2560对Dobot进行简单的二次开发。
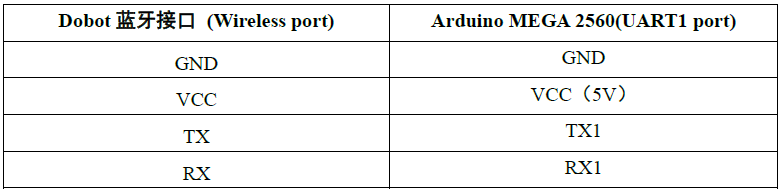
二次开发时需要将MEGA2560控制板通过蓝牙模块的接口连接到Dobot主控板,同时将主控板拨到蓝牙模式。接线图如下:

图1 接线方式
接线方式:
1.客户端下发指令的格式
Dobot通讯指令采用固定帧格式,每帧数据共(2+ 4 * 10) = 42个字节,其中包括包头(0xA5)、包尾(0x5A)和10 个参数,所有参数均为单精度浮点型(32 位),每个参数大小为4个字节(除语音控制指令,语音控制指令的包头(0xB5)和包尾(0x5B))。如下:

图2 指令格式
因此我们可以先定义两个数组,一个是42字节的用于发送给机械臂的,另一个包含10个浮点型参数。这样我们就可以通过控制这10个变量来控制机械臂的运动模式、速度以及加速度参数。具体定义如下:
// Send a 42 byte data packet to the dobot according to the communication protocol.
void cmd_str_42_send()
{
cmd_str_42[0] = 0xA5;
for( char i = 0; i < 10; i++ )
{
* ((float *)(cmd_str_42 + 1 + 4 *i)) = float( cmd_str_10[i] );
}
cmd_str_42[41] = 0x5A;for( char i = 0; i < 42; i++ )
{
Serial1.write( cmd_str_42[i] );
}
}
有了这两个数组,我们就可以随时给dobot发送指令了。
2. 参数配置
在控制机械臂运动之前需要先发送配置指令,对运动参数进行配置。现在我们利用上面定义的数组,来配置机械臂的运动参数。根据协议,state=9时为运动参数配置。如下图:
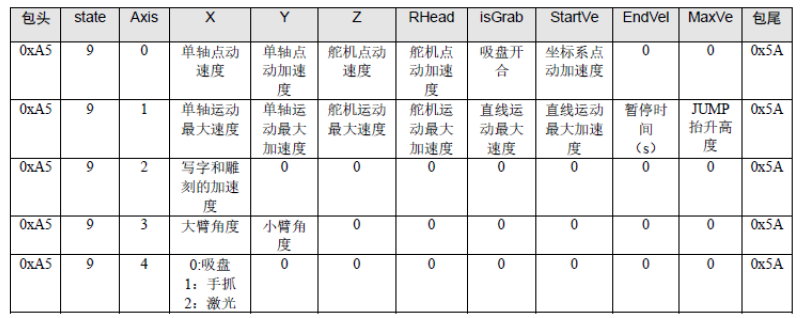
为了简化起见,我们这里选择Axis=0,并仅对单轴点动速度和单轴点动加速度进行配置,其余保持默认。程序示例如下:
//Set parameters of Dobot with state 9.
void dobot_cmd_3( int axis= 0, int Joint_jog_speed=0, int Joint_jog_acc=0){
for( char i = 0; i < 10; i++ ){
cmd_str_10[i] = 0;
}
// refer to protocal file for detail
cmd_str_10[0] = 9;
cmd_str_10[1] = axis;
cmd_str_10[2] = Joint_jog_speed;
cmd_str_10[3] = Joint_jog_acc;
cmd_str_42_send();
}
这样我们就进入了模式9,并可以配置机械臂的单轴点动速度和单轴点动加速度。参数配置好后,再用同样的方法选择机械臂的运动模式,即可控制机械臂进行动作了。
3. 点动模式demo
点动模式的参数说明如下:

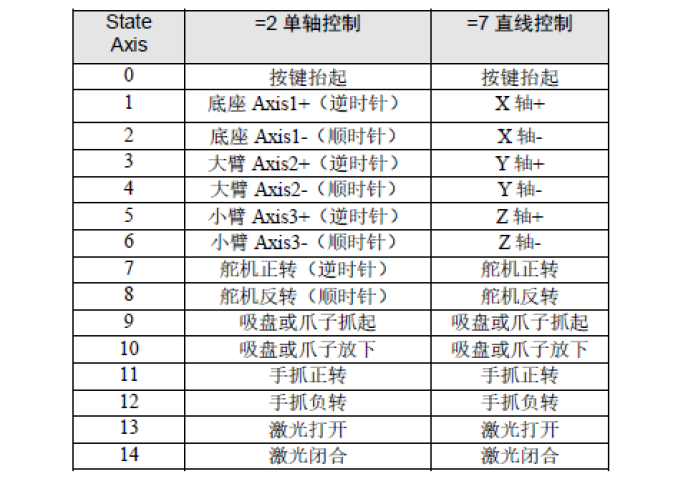
我们选择state=2单轴控制,按键选择3和4,来控制底座旋转。程序完整示例如下:
/*
** demo that dobot controled by another Arduino MEGA 2560
** with dobot firmware V1.2.0
**
** connections:
** dobot side(Wireless port) | another Arduino side(UART1 port)
** GND ------ GND
** TX ------ TX1
** RX ------ RX1
** note: if another Arduino is self powered by USB or 12V, just connect above 3 lines is OK
** if another Arduino has no USB or 12V power, another connection between VCC ------ 5V is needed.
**
** 20160523
*/
static float cmd_str_10[10];
static unsigned char cmd_str_42[42];
// Send a 42 byte data packet to the dobot according to the communication protocol.
void cmd_str_42_send()
{
cmd_str_42[0] = 0xA5;
for( char i = 0; i < 10; i++ )
{
* ((float *)(cmd_str_42 + 1 + 4 *i)) = float( cmd_str_10[i] );
}
cmd_str_42[41] = 0x5A;for( char i = 0; i < 42; i++ )
{
Serial1.write( cmd_str_42[i] );
}
}
//Set parameters of Dobot with state 9.
void dobot_cmd_3( int axis= 0, int Joint_jog_speed=0, int Joint_jog_acc=0){
for( char i = 0; i < 10; i++ ){
cmd_str_10[i] = 0;
}
// refer to protocal file for detail
cmd_str_10[0] = 9;
cmd_str_10[1] = axis;
cmd_str_10[2] = Joint_jog_speed;
cmd_str_10[3] = Joint_jog_acc;
cmd_str_42_send();
}
//Set joint jog mode with state 2.
void dobot_cmd_2( int axis= 0, int StartVe= 0 ){
for( char i = 0; i < 10; i++ ){
cmd_str_10[i] = 0;
}
// refer to protocal file for detail
cmd_str_10[0] = 2;
cmd_str_10[1] = axis;
cmd_str_10[7] = StartVe;
cmd_str_42_send();
}
void setup() {
// put your setup code here, to run once:
// Serial1 connected with dobot
Serial1.begin(9600);
}
void loop() {
// put your main code here, to run repeatedly:
// wait dobot init…
delay( 1000 );
dobot_cmd_2( 0,0); // button released
dobot_cmd_3( 0,50,100); //configure the joint jog speed and the joint jog acceleration before controlling the dobot to move.// move 3 loop
for( char i = 0; i < 2; i++ ){
dobot_cmd_2( 3,50); // joint1+(CCW)
// here just delay a few time between two cmd send simply
// for better performance, next cmd can be send out if a new frame on rxd is received
delay(1000);
dobot_cmd_2( 0,0);// button released
delay(1000); //decelerate
dobot_cmd_2( 4,50);//joint1-(CW)
delay(1000);
dobot_cmd_2( 0,0);// button released
delay(1000); //decelerate
}
//end
while(1);
}
以上程序通过Arduino编译并上传到Arduino MEGA主板后,会使底座来回旋转三次。同理,选择state=7,即可控制dobot进行坐标系点动,这里不再赘述。
4. 存点回放模式demo
同样,我们可以依据通信协议,设定Dobot的一系列运动坐标,让其自动回放动作。我们这里采用视觉运动模式3,使dobot在Z轴方向上下来回运动3次。程序范例如下:
/*
** demo that dobot controled by another Arduino MEGA 2560
** with dobot firmware V1.2.0
**
** connections:
** dobot side(Wireless port) | another Arduino side(UART1 port)
** GND ------ GND
** TX ------ TX1
** RX ------ RX1
** note: if another Arduino is self powered by USB or 12V, just connect above 3 lines is OK
** if another Arduino has no USB or 12V power, another connection between VCC ------ 5V is needed.
**
** 20160523
*/
static float cmd_str_10[10];
static unsigned char cmd_str_42[42];
// Send a 42 byte data packet to the dobot according to the communication protocol.
void cmd_str_42_send(){
cmd_str_42[0] = 0xA5;
for( char i = 0; i < 10; i++ ){
* ((float *)(cmd_str_42 + 1 + 4 *i)) = float( cmd_str_10[i] );
}
cmd_str_42[41] = 0x5A;for( char i = 0; i < 42; i++ ){
Serial1.write( cmd_str_42[i] );
}
}
//Set target moving mode with state 3.
void dobot_cmd_3( float x = 260, float y = 0, float z = 0 ){
for( char i = 0; i < 10; i++ ){
cmd_str_10[i] = 0;
}
// Set the X/Y/Z coordinates of the end effector, please refer to protocal file for details.
cmd_str_10[0] = 3;
cmd_str_10[2] = x; //x
cmd_str_10[3] = y; //y
cmd_str_10[4] = z; //z
cmd_str_10[7] = 2; //MOVLcmd_str_42_send();
}
void setup() {
// put your setup code here, to run once:
// Serial1 connected with dobot
Serial1.begin(9600);
}
void loop() {
// put your main code here, to run repeatedly:
// wait dobot init…
delay( 2000 );
dobot_cmd_3( 260, 0, 30 ); // set the initial position of the end effector
// repeat 3 times
for( char i = 0; i < 3; i++ ){
dobot_cmd_3( 260, 0, 0 );//lower down the end effector
// here just delay a few time between two cmd send simply
// for better performance, next cmd can be send out if a new frame on rxd is received
delay(500);
dobot_cmd_3( 260, 0, 30 );// lift the end effector
delay(500);
}// end
while(1);
}
基本的介绍到此结束,希望可以给大家带来帮助!示例视频大家可以观看YouTube链接:
https://youtu.be/QGIbQJeDgCQ